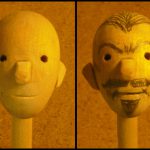
 A Man of Many Faces: a Prototype Wooden Head from Basic Shapes
Creating interesting characters is an important part of making a wood automaton because they are often the actors on the mechanically-driven stage. In this article, we will make a generic male head that does not require woodcarving skills or special tools. This head can be modified to create countless different characters for your projects.
 What You Will Need
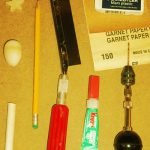
The project requires some pre-cut wood shapes and a few hand tools. The wooden shapes are available at craft stores or online and are sold in a variety of sizes. The exact size isn’t as important as their sizes relative to each other.
Wood Shapes
- Hardwood egg – 1 3/8 inches long (approximately 35 mm)
- Dowel – a short length, 3/8 inch diameter (approximately 10 mm)
- 5 pointed star – 1 inch from tip to tip (approximately 25 mm)
Tools
- Pencil and eraser
- Sandpaper – 150 grit or similar
- Hobby saw – such as an X-acto or Zona Razor saw
- Drill or pin vice with a small drill bit – I used a 3/32 inch (2.4 mm) bit
- Cyanoacrylate glue – common brands include Krazy Glue and Super Glue
Faces: The Same, but Different
The funny thing about human faces is they are all roughly the same. It may not seem possible, but facial proportions only vary by small amounts. By using these common proportions, we can create a fairly standard head to work with. Another important thing to note is that the human head is not spherical. The head is shaped much more like an upside down egg, so that’s exactly what we will use.
 Layout the Lines
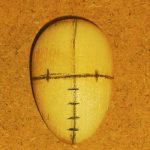
We are going to follow a simple rule-of-thumb method for facial proportions used by artists and cartoonists. Let’s draw some pencil lines on the wooden egg to aid us in positioning the features of the face.
Step 1. Divide the upside down egg in half with a vertical and a horizontal line.
Step 2. Divide the horizontal line into 4 equal parts by adding two short marks.
Step 3. Divide the lower half of the vertical line into 5 equal parts with short marks.
The vertical reference line is the centerline of the face on which the nose and mouth will be placed. The horizontal reference line will help us locate the eyes and ears.
 Drill Some Eyes
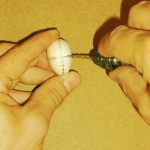
There are many ways to create eyes, but for our purposes small holes will work. Drill holes at the two points on the horizontal line located on either side of the vertical center line. Try to drill the holes such that they face forward. You don’t need to drill a deep hole — an 1/8 (or 3.2 mm) of an inch will do. That’s it!
 Create a Nose
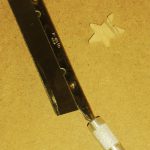
Take the star shape and cut off two of the tips in one cut of the hobby saw. You will only need one of the two pieces created, but it is good to have a spare. The nose should start at the horizontal reference line and extend down two marks. Wrap a bit of sandpaper around a piece of dowel and sand the surface that will be glued to the egg into a slight concave shape.
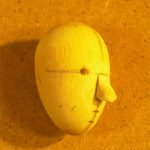 When the nose is the right length and fits the contour of the egg well, glue it to the face with some cyanoacrylate glue, making sure to center it on the vertical reference line.
Once the glue has dried, use sandpaper to round the front edges on both sides of the nose. You can also sand down the corners on the bottom of the nose on both sides.
 Make the Ears
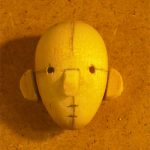
Saw a 1/8 inch slice off the end of the dowel and then cut it into two equal halves. Round the flat sides of the two semicircles so that they conform to the side surfaces of the egg. Position the ears just past the center line of the egg when viewing the face in profile. The tops of the ears should be about even with the eyes. I like to tilt the upper portion of the ears back a little. Glue the ears in place. Once the glue has dried, sand the lower portion of the ears so they are larger at the top and smaller at the bottom.
 Adding a Mouth
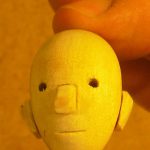
Because we will be experimenting with the mouth later, just make a very short cut with a hobby saw on the line directly below the nose (i.e. the third one down from the horizontal reference line). Clean up all of the pencil lines with an eraser.
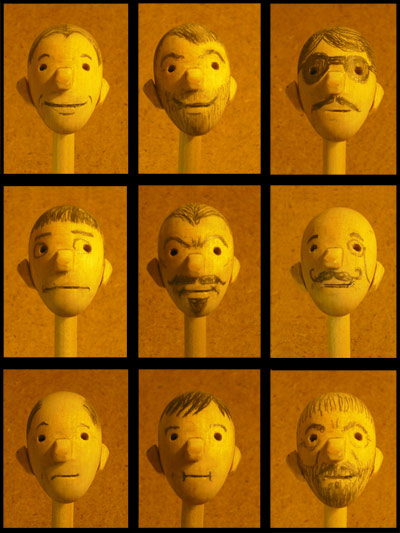
Congratulations, you have just made a prototype wooden head! Your head should look something like the one shown here.
Experimenting with Features
Now it’s time to have some fun experimenting with facial features. Grab a pencil and start drawing, keeping your lines light so they can be erased easily.
Things to try:
- Eyebrows – high and low, thick and thin, different angles
- Mouth – thin lines and shapes that look like an open mouth, centered and off-center
- Wrinkles – under the eyes, around the mouth, and on the forehead
- Hair – more and less, various hairlines and patterns
- Facial hair – moustache, beard, sideburns
- Miscellaneous details – freckles, scars, whiskers, eyeglasses, eye patch, etc.
Draw a face, and note the effect produced by the placement of certain features. Erase what you have done and create an entirely different face. Repeat the process!
Once you settle on something, you can use paints to make the features permanent. Additional variations can be obtained by making very small changes to the position of the eyes, nose, and mouth. If you like, spend some time shaping the nose, ears, and contours of the face, as well as the shape of the head itself. Of course, you can also add materials for things such as hair, clothing, jewelry, eyeglasses, and hats. The combinations are almost endless. Now: go make somebody!
For a list of materials and further reading visit Dug’s Tools and References page.
 Dug’s Automata Tips, Techniques and Tricks
A quarterly column by automata-maker and enthusiast Dug North
Copyright 2011 Dug North
Warning: The topics covered in this column include the use of tools and materials that have the potential to cause damage to property and/or bodily injury. Your safety is important and it is your sole responsibility. Always read and follow the safety instructions that come with tools and materials you use. Wear safety glasses, use guards and other forms of safety equipment, follow safety precautions, and use good judgment. Seek the guidance of experienced outside sources whenever required.

“Another well done for you Doug !” Speaking of automata, I myself recently had an abdominal aortal stent put in place inside an aneurysm. I’m slowing being turned into an automata myself given I now have plastic lens that fixed the cataracts and a stent made out of Gortex, DuPont’s synthetic leather ! Guess what was used to close the two little incisions made in putting the stent in place ? “Crazy glue !”
I’ve employed the same technique you illustrate in the making of numerous heads which has saved a lot of bench time. Buying the wooden balls and eggs from my local craft store has saved a lot of money in the long run.
One procedure I always do before finish painting any head or part is to give it a coat of shellac which seals the grain or rough spot before the acrylic finish. To add hair texture to the head I paint the area I want textured with white glue and then dip it in a tray of sawdust.
Spider
Dug, as always thanks. James, thanks for the hair technique!
Ron
Spider,
Thank you for the kind words.
I have found out the hard way that Crazy Glue bonds skin VERY effectively. My rule is to keep a tube of Super Glue remover right next to the Super Glue itself on my workbench. Anyone new to this type of glue should probably do the same.
That’s a great tip about the sealing the wood with shellac before painting with acrylics. Have you found that you need to use one that does not contain wax (such as a ‘Sanding Sealer’) or will any shellac do?
What a clever technique for the hair! I’ll have to give that a try. I imagine different types of sawdust produce different types of hair.
-Dug
Ron,
You are most welcome!
-Dug
I do not use sanding sealer of any sort as it does contain wax, just plain shellac.
So as to have shellac brushes ready to go at any time, I recycle the spagetti sauce jars by filling them halfway with denatured alchohol. I bought a box of cheap, 1″ brushes from Harbor Freight. I then cut off part of the brush handle so that it will fit inside the jar with the lid screwed on. The only thing you need be careful about is that shellac doesn’t build up too much under the lid. Another trick I use in not wasting expensive shellac is to punch a number of holes with a nail in the groove of a newly opened can.
Any shellac that gets into the groove as you dip the brush runs back into the can.
Another technique I use to dry the freshly shellaked parts is to place them on some cheap, wire cooling racks bought at the local Dollar Store.
I’m not cheap, just frugal !
Spider
It seems that “sanding sealer” can mean many things. I didn’t realize that. I was thinking of Zinsser’s SealCoat, which is a clear dewaxed shellac. As you point out, though, many other products called “sanding sealer” DO contain wax or other agents such as zinc stearate. Good to know!
Fantastic tips! Thanks so much for sharing those.
-Dug
I literally stumbled onto another cheap source of material for the making of heads. The experiment using this material is still underway but so far it seems to be working well.
I’ve been recycling the 4 cup, pressed paper mache’ coffee holders supplied at most coffee shops. I tear up these holders and place them in a large bowl of warm water where they quickly become a clay like pulp after squeezing out the excess water. Using a bit of wire as an armature, I formed several test heads. One head cracked a bit when it dried which was fixed with a little filler.
Dipped in shellac to seal the pourisity, I then apply several layers of acrylic gesso which readies them for the finish paint.
Spider
Spider,
Your clever paper-pulp technique builds upon a long history of automata heads being made of paper-mache. I really like your idea. I may have to give that a try.
Thanks again for sharing a really useful technique!
-Dug