 Making Pulleys and Belts for Automata
Pulleys and belts are incredibly useful to the automaton maker. They can transfer power from one axle to another and change the speed, direction or plane of rotation! Check out Cabaret Mechanical Movement for more information about pulleys.
In this article, we will use a simple approach to make a pair of pulleys and make a belt from O-ring gasket material.
 What You Will Need
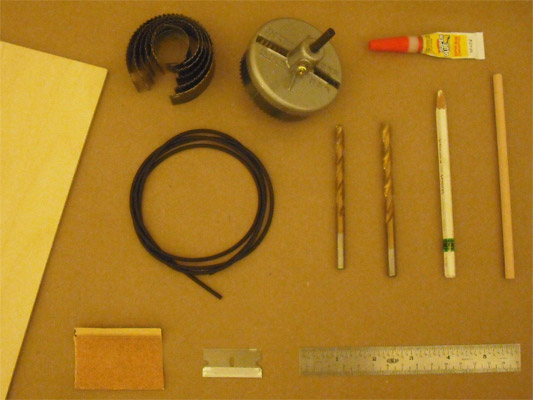
This project requires thin plywood, dowels, and a few tools:
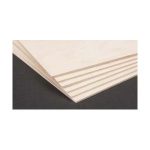
Wood
Tools and Materials
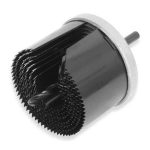
Hole saw, or other means for cutting circles of different size
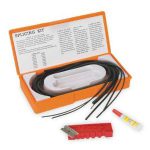
O-Ring Splicing Kit
or the following:
Also
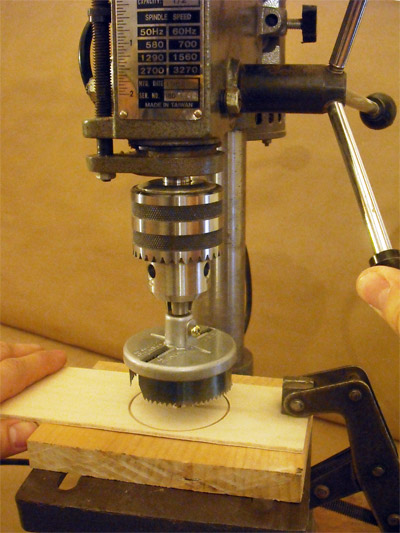 Cut Some Circles
The two pulleys are made up of six circles total. The four larger ones form the sides of the pulleys while the two smaller ones make up the center sections. I used a hole saw set mounted in pillar drill (drill press). If you don’t have a hole saw or pillar drill, refer to my previous article, Wooden Circles for Your Automata.
Place a piece of scrap wood under the 1/8″ plywood and clamp both securely to the pillar drill table. Cut the four larger circles using a 2 1/2″ diameter hole saw. Cut the two smaller circles with a 2 1/4″ saw. Use 150 grit sandpaper to smooth the edges of the circles.
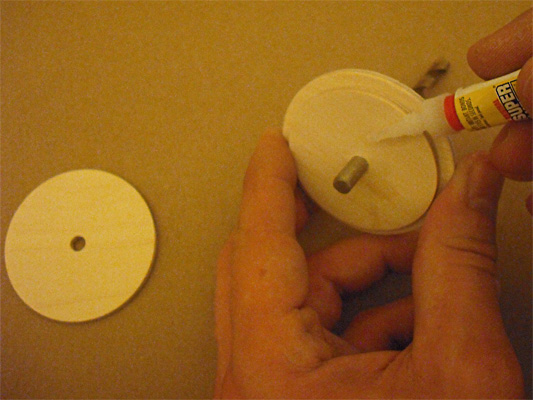 Glue the Circles Together to Form Pulleys
Use the base end of a 1/4″ drill bit to align the three pieces of each pulley as you glue them together. Be careful not to get glue on the drill bit!
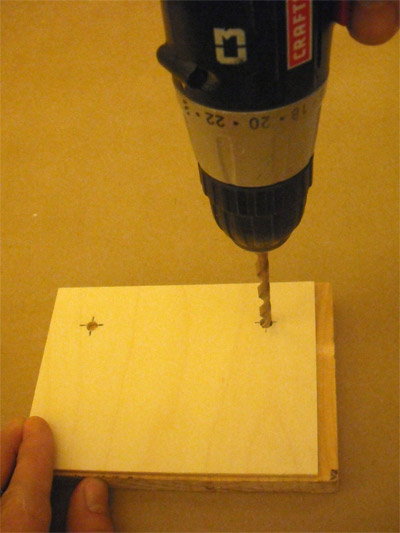 Cut and Drill the Test Board
From the remaining plywood, cut a rectangle measuring about 4″ by 6″ (or 10cm by 15cm). Drill two 17/64″ holes through the board. Locate the holes 1″ (2.5cm) from the top edge and 1″ from each of the sides. Sand any ragged edges around the holes smooth. We’ll use this board to test the pulleys.
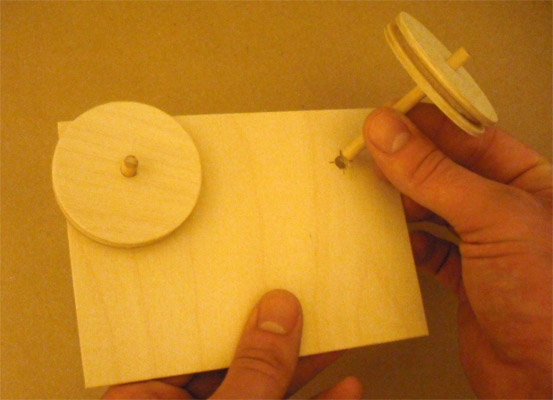 Mount the Pulleys to the Axles and Testing Board
Press each of the pulleys on to a 2″ (5cm) length of 1/4″ dowel. The dowels will serve as axles for the pulleys. Apply a drop of glue at the seam where the axle passes into the pulley.Insert the pulley axles into the holes in the test board. Keep the board horizontal while testing or cut pieces of wood with 1/4″ holes in the middle and press them on to the dowels from the back to keep the pulleys in place.
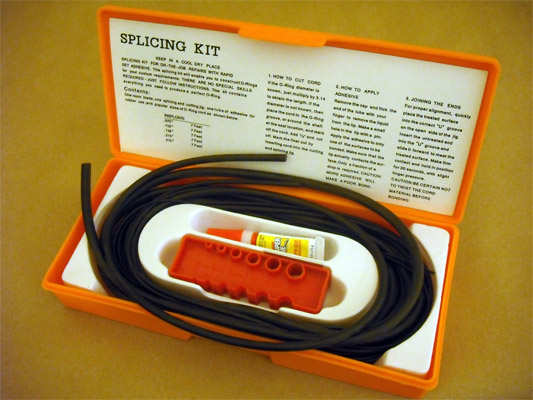 O-Ring Belts
O-ring material is made from Buna-N, also known as Nitrile rubber. I used an O-ring splicing kit to make the belt. The splicing kit is convenient, but not required. You can get by with the O-ring material itself, cyanoacrylate glue, and a single-edged razor blade.
 Using the Splicing Jig
Pick one end of the O-ring belt material and push it through the 1/8″ hole in the splicing jig. Place the razor in the slot at the top of the jig and push down to cut the belt material. If you do not have the splicing kit, simply place the belt material on a suitable cutting surface, and use a razor blade to cut it.
 Cut the Belt to Length
Wrap the belt material around both pulleys until it forms a loop. Hold both strands between the thumb and first finger of your left hand. With your right hand, pull the long, uncut end of the belt material while holding the previously cut end in place. Pull until you feel the material start to stretch a little. Make a mark with a white pencil on the uncut section where the cut piece ends. Cut the belt material at this mark.
 Glue the Belt into a Loop
The top side of the jig has a series of U-shaped channels to aid in gluing the belts together. Apply a very small drop of cyanoacrylate glue to one end of the belt. Rest the end with the glue within the U-shaped channel designated for 1/8″ material. Slide the other end into the opposite side of the channel until it meets the glued end. Gently press the two ends together for 30 seconds.If you don’t have a splicing jig, no problem! Once glue has been applied, hold one end in each hand, and press them together. Keep the ends lined up so the belt doesn’t form with a bump in it.Once the glue has dried, gently try to pull the two ends apart. If they come apart easily, try again using less glue and give it more time to dry.
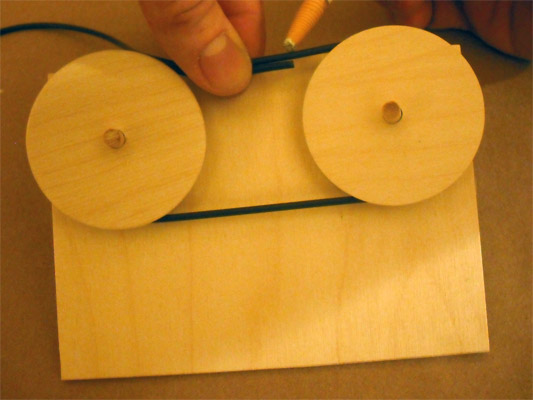
 Take It for a Spin!
Stretch the belt around both pulleys, then turn one of the pulleys by hand. If the tension is right, turning one pulley will cause the other to turn. If the belt is too loose, cut a very small section out of the belt around the glue joint, then re-glue it. The belt, now smaller, should cause the second pulley to spin. If the belt is far too tight, it will have too much friction to turn. You will need to add belt material or start over.
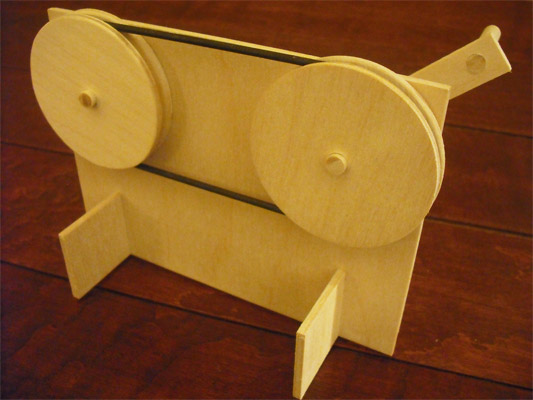
Make a Working Model and Experiment
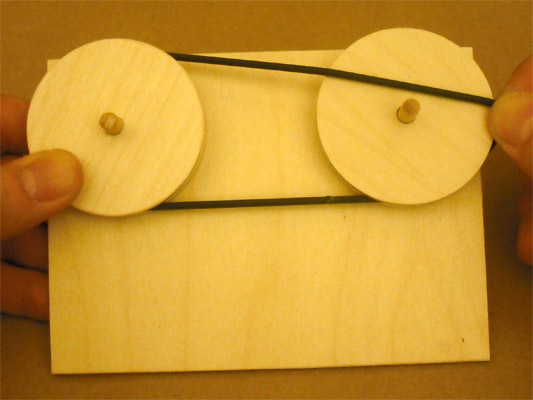
There should be enough plywood left over to make a stand for the testing board. Add a crank to the back of one of the axles and you’ve got a nice desktop demonstration model like the one shown at the beginning of this article. There is also enough plywood left to make some pulleys of different sizes. Make both large and small pulleys to see how different combinations affect the speed of the rotating axles.
 Dug’s Automata Tips, Techniques and Tricks
A quarterly column by automaton-maker and enthusiast Dug North
Copyright 2012 Dug North
Warning: The topics covered in this column include the use of tools and materials that have the potential to cause damage to property and/or bodily injury. Your safety is important and it is your sole responsibility. Always read and follow the safety instructions that come with tools and materials you use. Wear safety glasses, use guards and other forms of safety equipment, follow safety precautions, and use good judgment. Seek the guidance of experienced outside sources whenever required.
Further Reading:
 Cabaret Mechanical Movement: Cabaret Store (UK)
 Artist, inventor, and longtime author Rodney Frost is known for wacky, whimsical woodworking books that encourage readers to experiment. With his newest, most creative volume yet, he provides an introduction to the wild and whimsical world of kinetic art – art that moves.
Creative Kinetics: Making Mechanical Marvels in Wood by Rodney Frost: Amazon US – Amazon UK
Materials:
 O-Ring Splicing Kits Splicing Kit, Buna-N, 5 Pieces, 5 Sizes: Amazon US – Amazon UK
 1/8″ birch plywood: Amazon US – Amazon UK
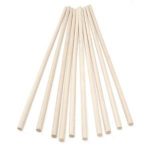 1/4″ Dowels: Amazon US – Amazon UK
 Hole Saw Set, 7 Piece:
  White Stabilo Marking Pencils:
Karl says:
Are there other alternatives to O Rings? My worry is that the O rings, like most rubber gaskets I’ve seen, will deteriorate over time. Could this be done with leather or cloth? Something more readily available and easier to repair or replace?
Rich Newman says:
Haven’t tried this, but I’m sure you can make a belt from heavy canvas or leather. In antique machinery I’ve seen where they are sometimes held together by rectangular links or staples.
Dug North says:
Karl,
One alternative to rubber would be the commercially made spring belts. I have found them to work well.
Adding to what Rich said, small watchmaker’s lathes were often driven by a leather boot lace connecting the motor to the spindle. The ends were sewn, glued or stapled together.
String, twine, cord, and emery cloth can be also used for belt material. I’m sure there are many other materials that would work too! You may find that you need to wrap something around the pulley for the belt to grip it well. Sandpaper, rubber bands, or leather glued to the surface of the pulley can help. You may also find that you need to add some type of tensioner to the belt if it’s not made of a somewhat elastic material.
-Dug
Richard Rees says:
Hi, I am new to automata but I recently used women’s hair elastics on a major project (YouTube – Noah’s Ark Automata). I did have to find one of a suitable length as the placing of the pulleys was already determined, however, the size of the pulleys could be adapted to suit the size of the hair elastic. Hair elastics come in a variety of materials and do not have to be joined – which has advantages and disadvantages. One advantage I found was that that in my automata the pulleys were close together and I wanted to twist the elastic to reverse the direction of the rotation. It has worked fine for over twelve months.
Dug North says:
Richard,
That sounds like a great solution! That’s not one I’ve tried before, but I certainly will now. Did you use a particular brand, diameter, or type? I must confess that I don’t know anything about women’s hair elastics.
I’m sure many others will find your tip very helpful. Thanks for sharing!
-Dug
Aryapriya says:
Very good Dug, just tried ‘hand splicing’ with the O-ring as you suggested. Blimey he glue stuck them together instantly! Even attempting to pull them apart to realign I couldn’t. It’s quite taught though. Could you do a tip on using chain (including where to get it!?) that would be cool.
Thanks! Find these tips really helpful.
Aryapriya, Totnes, Devon.
david says:
Hi Dug, do you find the holesaw set satisfactory ? I tried using them on acrylic in a vice ( a complete disaster ). A pillar drill faired not much better because of the heat generated, so melted and cracked the acrylic. Plywood was better, but I wasn’t convinced. When you put the blades in, they don’t feel that secure. Then when the blades cut, they get forced into the slots in the holder, getting wedged in tight. It was quite an effort to remove them, when you want to change sizes for instance. Whilst it may have been a cheap set I used, I threw them away because they were useless in my opinion. Something I rarely do as I even removes old screws to reuse.
Dug North says:
Aryapriya,
Thanks for suggesting an article on chains. I will give that some thought!
I’m glad you find the tips helpful!
-Dug
Dug North says:
David,
I have had good luck with it in a pillar drill (drill press) on softer, thinner materials — say 1/4 or thinner. For thicker materials I usually use one of the other methods shown in my Tips Article No. 2 (https://cabaret.co.uk/dug%E2%80%99s-automata-tips-techniques-and-tricks-no-2/). The fly cutter requires a pillar drill and some time, but produces very nice results.
As for cutting acrylic, that’s an entire topic unto itself! It’s very prone to melting with almost any saw. I have heard that sandwiching the acrylic between two sheets of hardboard can help minimize cracking, but haven’t done a test of that myself yet.
Best,
-Dug North